SIMPLE METHOD FOR FIXING CHORD ORGAN
IN CASE OF TUBE FAILURE
Start by pulling out tube No. 12
(See Inside)
where the tube is shown as (12)
at the top of the lower chassis). This will give you a "spare" 12AU7. tube
with which to test the other 12AU7 tubes.
(Taking out this tube will make the bottom six keys on the keyboard dead when
using the Organ stops only; of course, if the Organ tones of any of these six keys
were dead before you removed this tube, No. 12 would be the defective tube.)
Now continue by pulling out any other 12AU7 tube and replacing it temporarily
with your "spare" tube. Allow this tube to warm up (20 seconds)
and see if the trouble has disappeared. If the trouble is still present
it indicates that the old tube was okay.
You should then pull out the spare tube and replace with the original tube.
Now proceed to the next 12AU7 tube and do the same with it, first replacing it
with your spare tube, then trying the organ to see if the trouble is still present,
and then putting back the original tube if it is okay.
Repeat this procedure until you find the defective tube.
After finishing the test, return the spare tube to its original position,
socket No. 12. About 1/2 hour is required to test all 22 tubes, and about 90%
of the service encountered in the Chord Organ can be fixed in this way.
Note 1: You may prefer to wrap a handkerchief around a tube before removing it,
as some of the tubes get quite hot.
The instrument may be left on all through
the testing procedure as long as no more than two tubes are out at a time.
Note 2: In plugging a tube into its socket, first rotate it until you feel
it slip into the socket. Then push straight in.
Note 3: Tubes 2, 9, 10, 11, 27, 28, and 29 are not type 12AU7,
so you should not try your spare tube in these sockets.
6-STEP METHOD FOR TESTING TUBES
The following procedure, while slightly more complex,
is faster and has the advantage of testing all types of tubes used.
STEP 1
With balancer knobs horizontal, and expression lever about half open
Set up following registration:

(a) With Chord Bar pressed, press any chord button and listen for chord.
Then press several keys on keyboard and listen for notes.
If keyboard notes and chord button tones all sound normal, proceed to (b).
If there is no sound, or everything sounds weak,
faulty tube may be No. 11, 20, 27, 28, or 29.
If keyboard does sound but chord button tones do not sound (or are weak),
No. 1 tube may be faulty.
If tones of chord button do sound but keyboard note does not sound (or is weak),
No.20 tube may be faulty.
(b) Press any chord button (but leave chord bar released).
Now play left pedal and then right pedal.
If both pedals are silent or weak (or won't stop sounding when pedal is released),
No. 7 or 8 tube may be faulty.
If pedal notes are not deep in quality,
No. 7, 24, 25, or 26 tube may be faulty.
STEP 2
If instrument passes Step 1 satisfactorily, set up following registration:

(a) Play any note on keyboard. If no sound is heard,
No. 1, 2, or 8 tube may be faulty.
If a thumping noise is heard when a key is pressed,
No. 9 and No. 10 tube may not be matched properly.
If this is the case, these two tubes should be replaced with two new tubes
(b) Hold down any key on keyboard. While doing so, push in Vibrato Cancel
stops "Solo Wide" and "Solo Small" at top (so their dots disappear).
If vibrato effect (waver in pitch) is not added,
No. 2 or No. 5 tube may be faulty.
STEP 3
If instrument passes Step 2 satisfactorily, set up following registration:

Play scale up keyboard. If any notes are silent or weak
(or sound same pitch when "Soprano" stop is used in place of "Tenor" stop),
No. 3, 4, or 5 tube may be faulty.
STEP 4
If instrument passes Step 3 satisfactorily, set up following registration:

Play scale up keyboard. If any notes are silent or weak
(or sound same pitch when "Tenor" stop is used in place of "Bass" stop),
No. 6 or No. 7 tube may be faulty.
STEP 5
If instrument passes Step 4 satisfactorily, set up following registration:

(a) Hold down left pedal. Now press F major chord button
(but leave chord bar released).
If no bass pedal tone is heard,
No. 21 tube may be faulty.
(b) Repeat above procedure using G major chord button.
If no bass pedal tone is heard,
No. 21 tube may be faulty.
(c) Repeat above procedure using Bb major chord button.
If no bass pedal tone is heard,
No. 22 tube may be faulty.
(d) Repeat above procedure using C major chord button.
If no bass pedal tone is heard,
No. 22 tube may be faulty.
(e) Repeat above procedure using D major chord button.
If no bass pedal tone is heard,
No. 23 tube may be faulty.
(f) Repeat above procedure using Eb major chord button.
If no bass pedal tone is heard,
No. 23 tube may be faulty.
STEP 6
If instrument passes Step 5 satisfactorily, set up following registration:

Play up scale on keyboard starting with low F key (at left end of keyboard).
Silent or weak notes (usually in groups of 2 or 3 adjacent keys)
may be caused by tube No. 12, 13, 14, 15, 16, 17, 18, or 19.
The particular tube within this group which is associated with any key may
be determined from the following table:
Tube 12 generates Low F, F#, G. G#, A, and A# notes.
Tube 13 generates Low B, C, C#, D, D#, and E notes.
Tube 14 generates Middle F, F#, G, and G# notes.
Tube 15 generates Middle A, A#, B, and C notes.
Tube 16 generates Middle C#, D, D#, and E notes.
Tube 17 generates High F, F#, G, and G# notes.
Tube 18 generates High A, A#, B, and C notes.
Tube 19 generates High C#, D, D#, E, and Highest F notes.
HOW TO REPLACE A BURNED OUT PILOT LAMP
In the event that the pilot lamp doesn't light when the instrument is operating,
the bulb can easily be removed and replaced.
Unscrew the plastic dome and release the bulb by pressing it in and rotating slightly to the left.
It is a "number 44" (bayonet base, blue bead, 6-8 volts) and can be
obtained at a radio or hardware store.
CONTACT SHIFTERS
The various electrical switches which are operated by the playing keys and
chord buttons all have precious metal surfaces which are not subject to corrosion.
These switches are also sealed to exclude dirt. In spite of these precautions,
however, an occasional particle of dirt may lodge on a contact and cause it to fail
to operate correctly. To overcome this possible difficulty,contact shifters have
been provided for all the switches operated by the keyboard and chord buttons.
(a) Keyboard Contact Shifter.
If a single key only does not seem to operate properly
(but those adjacent to this key are working satisfactorily), the trouble may be due
to a faulty switch contact. First strike the key rapidly 15 or 20 times.
This will often loosen the particle of dust or dirt and fix the trouble.
If this is ineffective, the Keyboard Contact Shifter should be used.
This Contact Shifter for all the keyboard switches is shown in Figure 2
as a slotted stud under the left end of the keyboard.
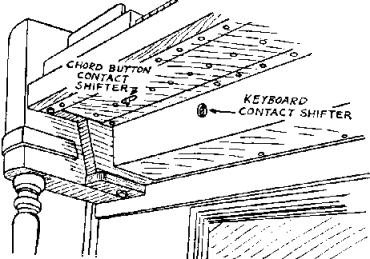
The Contact Shifter may be adjusted by turning the stud about two turns in either
direction with a screw driver. In extreme cases it may be necessary to hold down
the faulty key while turning the Contact Shifter, in order to wipe the contact clean.
(b) Chord Button Contact Shifter
If one or more of the chord buttons or pedals do not operate properly,
the Chord Button Contact Shifter should be moved sidewise (not turned).
As in the case of the playing keys, a chord button may be struck rapidly
15 or 20 times to loosen the dust or dirt.
If this is not effective, slide the Contact Shifter to the right or left about 1/16 inch.
If necessary hold down the faulty chord button while moving the shifter.
SPECIAL EQUIPMENT
Radio, Phonograph, or Microphone.
Radio, phonograph, or microphone amplifier will play through the Organ speaker
if connected to the pin jack marked "PHONO" on the Upper Chassis
(See Inside)
Your service man can make this installation for you.
This input has an impedance of 100 Kohms to ground, and a 1/4 mfd. condenser
should be used in series with the input signal.
The phonograph or microphone amplifier should have an output level of about
1/2 volt maximum, and should have its own volume control, as neither the
expression control nor the "Volume Soft" stop tablet will affect it.
The Chord Organ may be played at the same time.
The pin jack takes a standard type of single conductor shielded connector,
which may be obtained from a radio parts store.
Extension Speaker.
An additional permanent magnet dynamic speaker may be connected to the
green and black voice coil leads at the speaker.
For satisfactory results it must have an adequate baffle.
The voice coil leads may be left connected to the speaker in the instrument or not,
as desired, but the speaker field must remain connected.
Your service man can supply and connect a suitable speaker.
Hammond Organ tone cabinets may be used as extension speakers for the Organ.
Connect the two grid input terminals of the tone cabinet amplifier to the two voice
coil terminals on the Chord Organ speaker, and connect the ground terminal of
the tone cabinet amplifier to the Chord Organ power pack chassis.
The ground wire can conveniently be placed under a screw holding the
terminal panel cover.
The A-C power for the tone cabinet must be supplied through an external switch,
as the Chord Organ wiring is not designed to carry any additional load.
Earphones. Earphones may be used with the Chord Organ if someone wishes
to practice without disturbing others. Adequate volume can generally be secured
by disconnecting the green and black wires from the speaker voice coil terminals
and connecting the earphones to these wires.
The speaker field must remain connected.
TUNING INSTRUCTIONS
The Chord Organ has been accurately tuned before leaving the factory and
can be expected to remain in tune indefinitely under normal circumstances.
However, after long use under extremely adverse humidity conditions,
it is possible that some notes may not be exactly in tune with each other.
Before concluding that retuning is necessary, be absolutely sure that the notes
are actually far enough out of tune to make them unsatisfactory.
Remember that small differences in tuning are highly desirable
because they add a "chorus effect" which gives added richness to the tone.
This "chorus effect" accounts for the tonal beauty of large choirs of singing
voices or of many violins playing in unison.
The Chord Organ may be tuned in several different ways.
The simplest tuning may be done by merely turning the tuning knobs which are
located inside at the back on the main chassis
(See Inside)
The owner can make such adjustments very easily himself.
How to do so is fully explained below.
FIRST BE SURE THAT THE TUNING KNOBS ARE IN THEIR
"LAST SETTING" POSITIONS,AS MARKED IN THE SPACE PROVIDED
ON THE TUNING INSTRUCTION PLATE UNDER THE TUNING KNOBS.
IN CASE THEY HAD BEEN MOVED BY ACCIDENT,
YOU MAY NOW FIND THAT NO TUNING IS REQUIRED.
SIMPLE TUNING
To make this adjustment, set up the following registration of stops
(with the Balancers horizontal):

Now press the middle A# key on the keyboard
(eighth black key from the left end).
When this key is pressed, two different notes will be heard together.
They are close together, and the object is to bring them exactly together so they
sound like one good note. As they get closer, you will hear a "beating" sound.
The beats get slower and slower as the two notes get closer and closer,
and stop completely when perfectly tuned.
Merely find the position where the beat rate is the slowest.
In tuning, first turn the "SMALL STEPS" control to position 4.
Next turn the "BIG STEPS" control to the position which best tunes
the two notes to each other.
Then turn the "SMALL STEPS" control until the beat rate is the slowest.
This is the position for best tuning.
If you come up against one end of the "SMALL STEPS" control,
it will be necessary to turn the "BIG STEPS" control one step in
the same direction and then readjust the "SMALL STEPS" control.
Six steps on the "SMALL STEPS" control are approximately equal to one
step on the "BIG STEPS" control.
The player may sometimes wish to introduce a "chorus effect" in the tones of
the Chord Organ. This can easily be done by turning the "SMALL STEPS"
knob to the next higher marking.
The Meaning of the Small Steps. After you have followed the above procedure
you may wish to check the tuning on other notes of the keyboard.
Do not be surprised if some notes tune with the "SMALL STEPS" tuning knob
set one or two steps higher or lower than the setting for the middle A# key.
This is of no consequence because one step on the "SMALL STEPS" knob only
changes the tuning by one twelfth of a semitone.
This change in pitch is so small that it can only be detected by the "beats"
which can be heard when the< tone is sounded along with another note.
If you tuned the Chord Organ so there were
no beats on any key, the tone of the instrument would be much less pleasing.
For this same reason, symphony orchestras use many violins all playing the
same note. The beauty of tone which results is due to these violins all playing
slightly out of tune with respect to each other.
SCREW DRIVER TUNING
If, after tuning as above described, it is considered that some notes are far
enough out of tune to be unsatisfactory, the individual notes of the keyboard and
chord buttons may be tuned by the use of a screw driver as described below.
Before doing so, however, remember that small differences in tuning are actually
desirable because they add a "chorus effect"
which gives added richness to the tone.
The various notes of the keyboard may be individually tuned by adjusting the
coils located in the Lower Chassis as shown in Fig. 1 on page 5.
As here shown, each coil is marked with the corresponding keyboard note
with which it should be tuned. It is to be observed there are many more notes
on the keyboard than there are coils.
Each coil simultaneously tunes at least two adjacent notes on the keyboard and
some coils tune three adjacent notes. Fig. 3 shows which notes on the keyboard
are tuned by the various coils in the Lower Chassis.
For example, the three lowest notes on the keyboard
(Low F. Low F#, and Low G) are all tuned by the coil marked "LO F#." Thus,
if there is any particular note (or group of adjacent notes)
on the keyboard which seem to be out of tune,
you can determine which coil to tune by using Fig. 3.
Steps 1, 2, 3, and 4 below explain how to tune the keyboard notes.
All the notes produced by the Chord Buttons and pedals are tuned by
adjustment of the six coils in the Upper Chassis.
Steps 5, 6, 7, and 8 explain how these are tuned.
STEP 1.
Adjust tuning knobs as described in "SIMPLE TUNING."
This consists in finding the setting of the tuning knobs which gives the
slowest rate of beats on Middle A# as explained previously.
Note the readings of the two knobs (for instance "4--3") and remember this
number or write it down, if it is different from "last setting" on the name plate.
The object is now to tune various notes, as described below,
so that each one is best on this same setting, which we shall call "bogey,"
or a setting which is one small step higher or lower.
(See Keyboard)
STEP 2.
Press the Lowest F# key on the keyboard and wedge it down with a pencil at
the back of the key so that the note will continue to sound.
Hold the expression control in a position to secure adequate volume
(for instance, by placing a chair against it).
If the "beats" are very slow, this coil does not require tuning adjustment.
If in doubt, turn the Small Steps knob one step either way from "bogey."
If you must go two or more steps in either direction to find the best tuning,
then that particular note needs tuning. Otherwise not.
If you decide to tune that note, put the knob back on "bogey," and notice which
direction you must go to put the knob back on "bogey."
That is the direction in which you will tune the note as described hereafter.
STEP 3.
If the tuning is not satisfactory, it is remedied by an adjustment of the position
of the iron in one particular coil in the Lower Chassis.
All coils are marked with corresponding keyboard notes.
The upper left coil on the Lower Chassis is marked "LO F#," with letters
stamped in the chassis. This is also shown in
(See Inside)
which shows the positions of all the coils.
The position of the iron laminations in the coils is easily adjusted with great
accuracy, provided the construction of these units is understood.
BEFORE DOING ANY ADJUSTING, HOWEVER,
BE SURE THAT THE TUNING KNOBS ARE SET
AT THEIR "BOGEY" POSITIONS.
Figure 4 shows a typical coil and lamination assembly in the Lower Chassis.
The movable lamination assembly is to the left, and the stationary assembly is to
the right. The two assemblies are held in place by a retaining strap,
secured by the two adjustment screws.
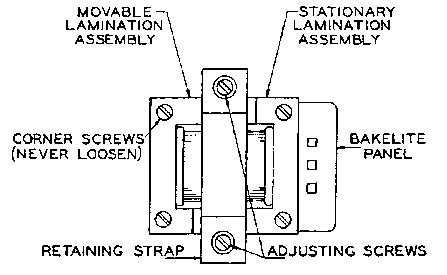
Never loosen the corner screws on any coil.
In order to tune, first loosen the two adjustment screws holding the strap by two
or three turns, but not more. A plain washer and a strong split steel
lock-washer are located under the head of each screw.
The object is to loosen the two screws to the point where each lock-washer is partly
open but still exerts a moderate pressure to hold the assembly in place.
In this condition the laminations cannot readily be moved with the fingers,
but may be tapped with a small hammer or similar hard object.
Each small tap moves the movable assembly by an invisibly small amount which
is nevertheless entirely adequate to change the tuning,
and makes very precise tuning possible.
To lower the pitch, that is to make the note more flat, one merely taps on
the left end of the laminations, as shown in Figure 5.
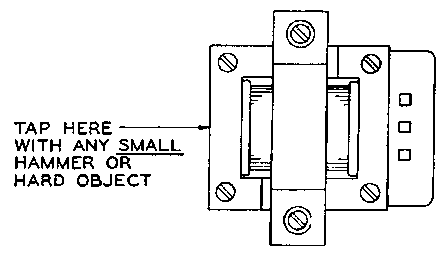
If the note being tuned was too sharp in the first place, each small tap will
make the beats slower. When the beats stop, tighten the screws gently,
but only to the point which closes the lock-washers.
It is unnecessary to tighten the screws more than this,
and tightening the screws too much may spoil the tuning and injure the screws.
If tapping as described above makes the beats faster, the note was already
too flat, and the object is then to tap the movable assembly away.
This is done with a screw driver, as shown in Figure 6.
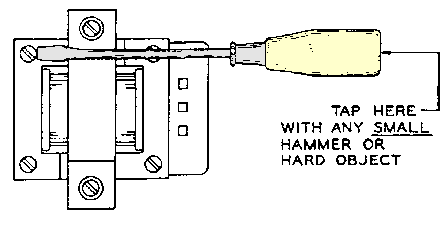
Holding the screw driver against the side of one of the left corner screws,
tap gently on the end of the handle of the screw driver and listen to the beat rate.
Do not use the same corner screw all the time,
but alternate between the two left screws.
Tapping on the screw driver in this position makes the note sharper.
Very little practice is necessary to find out how to tune in this manner.
Note: It is important not to make the mistake of tapping a coil which is
not associated with the note to which one is listening. To avoid this mistake,
it is a good idea to touch the end of the screw driver to the MIDDLE terminal
on the bakelite panel, at the same time touching the side of the screw driver to
the iron laminations, so as to connect this terminal to the iron lamination.
If one is listening to the correct note, a sudden reduction in volume will be heard.
HOWEVER, BE SURE NOT TO TOUCH OTHER THAN
THE CENTER TERMINAL TO STOP THE NOTE.
STEP 4.
Repeat STEP 3 for any other coils which require tuning in the Lower Chassis.
Do NOT adjust the "Mid A#" coil, which is marked
"TUNING STANDARD - SEE TUNING INSTRUCTIONS."
(It does not need adjustment because it is the coil to which the
middle A# note was tuned in STEP 1.)
Each time press the correct key as marked on the Lower Chassis.
BEFORE DOING ANY ADJUSTING, HOWEVER,
BE SURE THAT THE TUNING KNOBS ARE SET
AT THEIR "BOGEY"POSITIONS.
STEP 5.
Set up the following registration:

STEP 6.
Press the middle F# key on the keyboard and wedge it down with a pencil
at the back of the key so that the note will continue to sound.
Hold the expression control in a position to secure adequate volume
(for instance, by placing a chair against it).
Now remove the tuning pin from its clip on the Upper Chassis and insert it into
the center hole on the bakelite panel of the coil marked F# in the Upper Chassis
(See Inside)
The added tone which is heard is one of those used for the Chord Buttons.
If the "beats" are very slow, this coil does not require tuning adjustment.
STEP 7.
If the notes are not in tune, the F# coil on the Upper Chassis is to be tuned by the
same procedure that was used in STEP 3 for tuning the coils in the Lower Chassis.
The adjustment is the same except that the coils on the Upper Chassis are vertical
instead of horizontal.
BEFORE DOING ANY ADJUSTING, HOWEVER,
BE SURE THAT THE TUNING KNOBS ARE SET AT THEIR
"BOGEY" POSITIONS
STEP 8.
Repeat STEP 7 for any of the other five Upper Chassis coils which require tuning,
using the middle G#, A#, C, D, and E notes on the keyboard.
TUNING TO A PIANO, HAMMOND ORGAN,
TUNING FORK, WWV RADIO SIGNAL,
OR OTHER STANDARD OF PITCH
STEP 1.
Set up the following registration:

STEP 2.
Press the middle A# key on the keyboard as well as the corresponding A# key
on the piano or Hammond Organ. Adjust the tuning knobs until the instruments
are in tune with each other as described under "SIMPLE TUNING."
When using any other pitch standard such as a tuning fork,
hold down the corresponding key in the middle octave and adjust the tuning
knobs to tune the Chord Organ note to it.
STEP 3.
Set up the following registration:

STEP 4.
Proceed to adjust all the coils in the Lower Chassis as described in
STEPS 2 and 3 of "SCREW DRIVER TUNING."
The "MID A#" coil should be tuned as well as the other coils,
as it is not being used as a standard of pitch.
STEP 5.
Proceed to tune the six Upper Chassis coils as described in
STEPS 5. 6, 7, and 8 of "SCREW DRIVER TUNING."
HAMMOND INSTRUMENT COMPANY
4200 W. DIVERSEY AVENUE
CHICAGO 39, ILLINOIS
| 


